Saturday, August 31, 2013

Quesadilla Style Grilled Cheese Sandwiches with Pico de gallo

From the first fresh ripe red tomato until the end of the season, we have garden fresh pico de gallo.  In spite of the last three weeks of no rain and 100 degrees plus weather, this "Tomato" season is still in full force with tomatoes coming in ripe and fresh.

To continue with the tomato theme,  I am sharing with you my pico de gallo recipe that I love to serve up with Quesadilla Style Grilled Cheese.


I am using a "Garden Salsa Hot Pepper" and a "Biker Billy" jalapeno pepper in my pico de galla recipe.  This is my first year growing "Garden Salsa Hot Peppers" because the "Biker Billy" jalapeno transplants didn't fare that well.   While "Biker Billy" jalapenos are my all time favorite for "heat" and flavor, I have to admit I am pleased with the addition of the Bonnie Plant's "Garden Salsa Hot Peppers" to my salsa and pico de gallo.  The two distinct peppers in the pico de gallo added another layer of zest and heat to the dish without overpowering it.  If you get a chance to try it out, you won't be disappointed.  But, if you don't have one or the other, go ahead and use what you have for hot peppers.

 I like my pico de gallo dry, so I seed all my tomatoes before chopping them up real fine.  The way I seed them is to cut them in half and gently squeeze over the sink until all the seed pods and gel around the seed pods come out, sometimes I poke my finger in the pocket to remove the seeds and surrounding gel.  If you don't have a garbage disposal, squeeze the seeds out over a plastic bag to drain and toss in the garbage or compost pile.
Pico de Gallo Recipe:
  • 4 large ripe tomatoes, seeded and finely chopped.
  • 1 "Garden Salsa Hot Pepper", finely chopped (I use the seeds to add heat to my pico de gallo, if your family doesn't like heat, remove the seeds)
  • 1 "Biker Billy" jalapeno pepper, finely chopped (for less heat, remove the seeds)
  • 1/4 cup finely chopped onion
  • 1 teaspoon finely chopped garlic
  • 1 Tablespoon cilantro (fresh finely chopped is best, but I had to use dry in a pinch - if you use fresh, add another tablespoon.)
  • Juice from 1/2 lime (if you use canned lime juice, slowly add until it is at the flavor you like)
  • Salt and pepper to taste
That is all there is to it, mix it all up in a bowl and serve!  In our home we never have left overs, but if you do, make sure to refrigerate!

Now here is how I make Quesadilla Style Grilled Cheese Sandwiches:
To make two quesadilla style grilled cheese sandwiches, you will need:
  • 3 slices American cheese (I am old school and stuck on Velveeta)
  • 3 oz finely sliced cheddar cheese (I used Collier's because it is one of the cheddar cheeses that has a slight sweet taste, which compliments the Velveeta and contrasts well with the pico de gallo)
  • 4 flour tortillas
  • 2 Tablespoons butter (I only use organic)
  • 1 Tablespoon olive oil (in the pan to prevent over-browning of the butter)
 
Pour olive oil in a frying pan, spread around, turn the heat to medium.  Lightly butter one tortilla, place it in the frying pan butter side down.  Place the American cheese on top of the tortilla, then put the cheddar cheese on top of that covering any spaces.
Butter another tortilla and place it on top of the cheese.  In a minute or two, the tortilla will brown, when it browns, turn it over to let the other side brown.  Do this carefully, as the cheese will have melted.  You have to flip it like a pancake, if you want to keep the cheese from sliding out.
Keep the cheese that spills out the sides and let it brown up crisp.  You can put them on top when done.  The kids will love the cheesy crunchy bits!

When it is browned on both sides, put on a plate to cool for a couple minutes and put another buttered tortilla on the fry pan, layer with cheese, and brown.  You do not have to add more olive oil for the second one. Let that one cool too.

If you try to slice it too soon, the cheese will spill out all over the place.  I use a pizza cutter to slice, but you could use a knife instead.
I serve my quesadilla style grilled cheese sandwiches topped with the fried cheese bits alongside a good serving of garden fresh pico de gallo.  The tangy spicy heat of the pico de gallo is a perfect match with the quesadilla style grilled cheese - spicy, creamy, sweet-sharp, crunchy, and bright all in one delicious bite!  And bonus - it is so easy to make!


Wednesday, August 28, 2013

Canning Tomatoes - Zucchini Pasta Sauce

Cearle and Me! (circa early 1990s)
This is "Tomato" season carried on into canning 101 - Cearle and Ellen style!                            

When I first started out, I helped my Mom out in the kitchen, but when we got out on our own, my sister Cearle and I embarked on the adventures of learning to can.  If you can can with your Mom, a friend or a sister, count yourself as very fortunate! It is way more fun and a lot less work.  And, it is scientifically proven women who share life with friends are healthier and live longer!  I will always treasure those days spent in the kitchen with my Mom and my baby sister learning how to can together. 

Over the years, we tried everything and had tomatoes everywhere!  In our humble opinion, from a few very messy experiences and the amount of work that goes into it, don't try making tomato juice.  It is simply not worth it.  But canning whole tomatoes, salsa, and sauces is well worth the effort.  It is cheaper than store bought, the flavor is better, and you get to control what goes in the jar!  It is never too late to start; here is some advice to get you going.

In years past, we waited until just past peak to pick tomatoes from the Twiehoff Gardens and Nursery because money was short and we did not have enough yard space for that size of a garden.  

Generally in Minnesota, you should be able to buy a 1/2 bushel of tomatoes for around $35, but at Twiehoffs, if you pick them yourself after peak season, you can get them for much cheaper, at least back then you could.  

If you live in the Faribault, MN area, you should really check them out for their fruit and vegetables, you will not be disappointed.  The owners are the most down to earth honest people you will ever meet and their gardening practices are bar none. You will feel like you have just went down home country at Twiehoff's.  Home Sweet Home in the Garden!

I always wash my jars in a dishwasher when I get them new from the store or if I just used up a jar of tomatoes during the winter.  I store the jars rim side down in the cabinet so the quart jars are ready to put in a clean dishwasher on the steam mode wash cycle (very hot water and hot heat dry) to sterilize them.  When the cycle is finished, I leave them in the dishwasher to keep them real hot until ready to use.  If you don't have a dishwasher with high heat, wash them thoroughly and put them in a pot with some boiling water.  Make sure they are spotlessly sterile and hot when you use them! 

After setting my jars in the dishwasher, whether you pick your own or purchase some, you will want to wash the tomatoes before putting them in a pot of boiling water. 
It takes about a minute for the skins to crack, so while your water is setting to boiling, make sure you already have the ice water set up.  I use a slotted spoon and have an extra bowl to carry the hot tomatoes into the ice water.
Use a paring knife to peel the skins off and to cut the top green cores off the tomatoes.  This is very important: put your skins and tops in a disposable plastic bag.  I use the few plastic shopping bags I get when shopping.  When I was younger, I thought it would be easy to run them through the garbage disposal, well DO NOT do that unless you want to drag your husband into the kitchen to fix the garbage disposal.  I use a plastic bag, so I can pop some holes in the bottom of the bag to make it easy to drain the excess liquid before tossing in the garbage.  

If you have a compost pile or drum, you are fortunate and you know what to do with those scraps!

So, this year I had tomatoes, basil, and zucchini to put up and figured I'd alter a canning recipe to put them in a pot together.  The following is the recipe for my Zucchini Pasta Sauce. If you just want to can up the tomatoes, skip down to the part about canning crushed/whole tomatoes down below:


  • I finely chopped up 1/4 cup basil leaves.  Note, make sure they are blemish free!
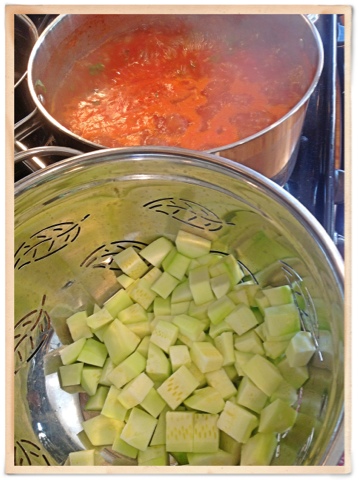
  • I peeled and diced up 2 medium zucchinis into bite size pieces
  • and added them to 12 medium to large (not huge) blanched and peeled tomatoes. (Some people like to crush the tomatoes with their hands, but I prefer to use a potato masher or you could use a fork.) 
  • To this pot, I also added 4 cloves pressed garlic, pressed through a garlic press (my favorite is Pampered Chef's)
  • and 1/2 medium onion chopped finely.
I brought this pot to a boil and boiled the zucchini pasta sauce for 15 minutes or until reduced by about an inch from the top of the soup pan. My mother taught me to remove the cloudy film that formed at the top of the pot, so I take a spoon and skim off the cloudy film/foam off the top and toss that away.
If you are canning crushed/whole tomatoes, I boil mine for five minutes before putting in the clean jars, but you can cold pack them too, just make sure they are filled within 1/2 inch of the top of the quart jar.  

If you are canning the Zucchini Pasta Sauce, fill the quart jar within 1/2 of the top of the jar. 

For either crushed/whole tomatoes or Zucchini Pasta Sauce:
  • Add 1 teaspoon canning salt (Yes there is a difference - look in the canning isle at the market!)
  • Add 2 Tablespoons bottled/NOT fresh lemon juice or 1/2 teaspoon citric acid (You can find citric acid in the canning isle too.)
Make sure you exactly follow your manufacturer's instructions for preparing and processing the pressure canner.  This is NOT something to mess with at all!  

Heat your lids in a small saucepan of boiling water.  It should only take about a minute; don't over boil your lids!  After wiping the rim of the jars to wash off any trace of food particles (I use a clean slightly damp flour cloth towel wrapped on my pointer finger tip), put on your lids and screw the ring over-top.  Only hand squeeze the ring; there is no need to squeeze it over tight.  

Place your jars in the pressure canner at 10 lbs pressure and process as follows:
  • 25 minutes for crushed/whole tomoatoes
  • 35 minutes for Zucchini Pasta Sauce.  

As you can see from the photos, I got 3 and 1/2 quarts of Zucchini Pasta Sauce.  You will either need to freeze or use the left over 1/2 quart.  This is what I did with mine to make two good sized servings of pasta, as the main course.
 

I always make my own chicken broth, if you don't you can purchase your favorite brand to make up about 1 and 1/2 cups of chicken broth.  (If you want to know how to make your own chicken broth, send me a comment and I will share.)  
  • Add the 1 and 1/2 cups of  broth to the Zuchinni Pasta Sauce pan (mine is from the canning). 
  • Add 1 Tablespoon lemon juice (if you use your canned sauce, don't add more lemon juice)
  • Bring it to a boil, then add 1 cup dry mostaccioli (or your favorite pasta)
  • Turn down to medium low and cover
  • Stir often until pasta is tender.
  • I added 1/2 lb browned ground lamb (this is totally optional - bet it would also be great with grilled chicken!)
  • I added 1/2 Tablespoon red pepper flakes because my husband likes it spicy (this is also optional)
  • Season to taste with salt and pepper 
I added some shredded Parmesan cheese to mine and served with grilled baby broccoli and garlic toast.  My husband explained; "It is so creamy".  "I love it".  This is good because we have at least three quarts to eat up this winter! 


Saturday, August 24, 2013

Fried Green Tomatoes, Southern Style with a Twist

This is another one of our favorites to add to "Tomato" Season; fried green tomatoes.   No respectable Southern gardener, who grows tomatoes, will neglect to fry up some green ones.  In fact, I bet there isn't a child from the South that has not had some.

As a child, I was fortunate my Mom, born and raised in Texas, taught me to cook and to cook with creativity.  Her cooking style is a bit of North and a lot of South, which we LOVE!!!  Our family simply does not "fill up a big pot and stir in bland" - we love flavor and spice.  Anyhow, Mom made the best fried green tomatoes in a perfectly seasoned cast iron pan!  I can still see myself in pig-tails, elbows on the table, head resting on my hands waiting for my share to come out of the frying pan all hot and tasty!  My mouth is already watering!

I had a few green tomatoes in the garden that looked like they might turn out bad, so I grabbed them out of the garden, cut off the dark spots on the top and sliced um up to turn them into Fried Green Tomatoes, Southern Style with a Twist. 
 
This year, in a pinch, I grabbed Southern Living's fried green tomato recipe.  Am I glad I did!  It is now my go to recipe, but I must confess, as usual, I changed it up.  See below for what I did to this incredible recipe to make it EVEN BETTER!
 

First off, my husband's brother, Thomas lives in South Carolina and Barry's family swears there is NO better corn meal then Joy Brand made in Lakeside Mills, North Carolina.  Every so often Thomas mails me a bag.  I have to say it is the BEST corn meal available.  This is what I used in the Southern Living recipe.  BTW: I put my corn meal in a freezer bag and freeze so it is good and fresh when I use it.


The other change I made was out of necessity because I did not have buttermilk.  But, I do have kefir milk, so that is what I used instead of the buttermilk.  I figure they both have a tangy lemony taste, so why not?!

The crust's texture is crunchy, like a good piece of fried chicken, sweet and tangy, from the corn meal and kefir milk.  The sliced tart green tomatoes retained their firm texture and were  complimented by that buttery, crunchy, tangy, crust.  

I fried up all three tomatoes, our bird Sammy ate two slices (I know, I know he isn't supposed to eat fried food), and we finished the plate of um in one sitting! 

I was about to put these two slices in the fridge, when I couldn't resist taking one more bite.  The best part is usually I don't care for cold fried green tomatoes, but the crust retained it's flavor and texture and didn't get "greasy tasting". We bargained over the rest of um until they were gone.  If you have never tried fried green tomatoes, you gotta try this recipe.  Your family will love them! 

Friday, August 23, 2013

Southern-Italian Tomato Sandwich

It is "Tomato" season in most Minnesota gardener's homes, so thought I'd share with you my "simmer" time ideas on tomatoes.  As a child, I can still recall picking one of these ripe tangy tomatoes right off the vine and eating it like an apple and let me tell you; "You cannot get one of these in the grocer's market".  This winter was especially bad in Minnesota; they looked like tomatoes, but had no flavor at all and the texture was like rubber.  

So, every year we wait in anticipation to harvest the first ripe tomato, which sometimes get gobbled up by me, barefoot in the soil of the garden with the warm sun shining down on me like yesteryear, juices squirting abound.  Yummy!  What was your favorite childhood memory of homegrown garden fresh tomatoes? 

My first post this year on tomatoes is Mom Bishop's recipe.  As a child, my husband's, Barry's favorite way to eat the ripe tomato fresh from the garden was his Mom's wonderful tomato sandwiches.  I have to admit I love them too!  Every "Tomato" season, I make Barry tomato sandwiches like his Mom used to, but this year I added a twist of my own - homegrown basil. The beauty of this recipe is it is SIMPLE and DELICIOUS!  The pictures say it all!

We are from the country, so really love the old school Real Hellman's mayo, but you can use your family's favorite brand or even make your own.  If you want a good mayo recipe, just let me know.

We slather a good amount of mayo on both slices of bread and load up the sliced tomatoes.  It is important to add salt and pepper to bring out the tangy juices of the tomato, but if you can't use salt or don't care for pepper, leave it off.  My husband loves fresh cracked pepper.  I added fresh basil, which you can omit or add your own fresh herbs.  I wonder what rosemary or thyme would add to this?  If you try something different, can you let me know what you did and how it turned out?

I am sure my home is no different then your's, my husband serves as the honorary food critic with all my recipes.  He LOVED the addition of the basil.  It took an all American Southern recipe and added an Italian twist - bright and fresh.  (Barry was born and raised in the South). We are so fortunate to live in the Great Melting Pot!  If you try this one, drop me a line on what you think! TTYL!